• Log In
  • Skip to main content
  • Skip to primary sidebar

E-Portfolio Tip of The Month

Temple University

temple logo

Embedding SlideShare

April 10, 2019 by Michelle Purnama Leave a Comment

E-PORTFOLIO TIP OF THE MONTH:

Embedding SlideShare

In this month’s tip, we will explore using an external platform and incorporate its functionality into your e-portfolio. SlideShare allows you to upload files in PowerPoint, Word, PDF, or OpenDocument format, and the content can be viewed on the site itself. It’s a great way to showcase some presentations that you’re proud of on your own site without making the viewer download the files or be directed to an external site.

Here’s how you can do it:

Step 1: Go to https://www.slideshare.net/login and login with your LinkedIn or Facebook account. Otherwise, you can create a new SlideShare account.

Step 2: Click “Upload”.

Step 3: Click “Select files to upload” and choose the presentation slides you want to showcase on your e-portfolio.

Step 4: Fill out all of the required fields. Make sure to set your “Privacy” setting to “Public.” When you’re done, click “Publish”.

Step 5: Once your file has been successfully uploaded, click “Share” at the bottom left and copy the URL in the “Link” section. You will need this for later.

Step 6: In your post/page on your e-portfolio, click “Add Media” → “Insert from URL” → paste the URL you just copied from SlideShare. Once it’s done, click “Insert Into Page” and publish your changes.

Step 7: You should be able to view your entire slide deck directly in your e-portfolio instead of having just a text that is hyperlinked to an external site.

Keep an eye on your inbox for the next tip!

If you have any thoughts or suggestions on tips that you’d like to see in the future, please let us know here.
Filed Under: Uncategorized Tagged With:

Personalize Your Point Submissions

March 5, 2019 by Michelle Purnama Leave a Comment

E-PORTFOLIO TIP OF THE MONTH:

Personalize Your Point Submissions

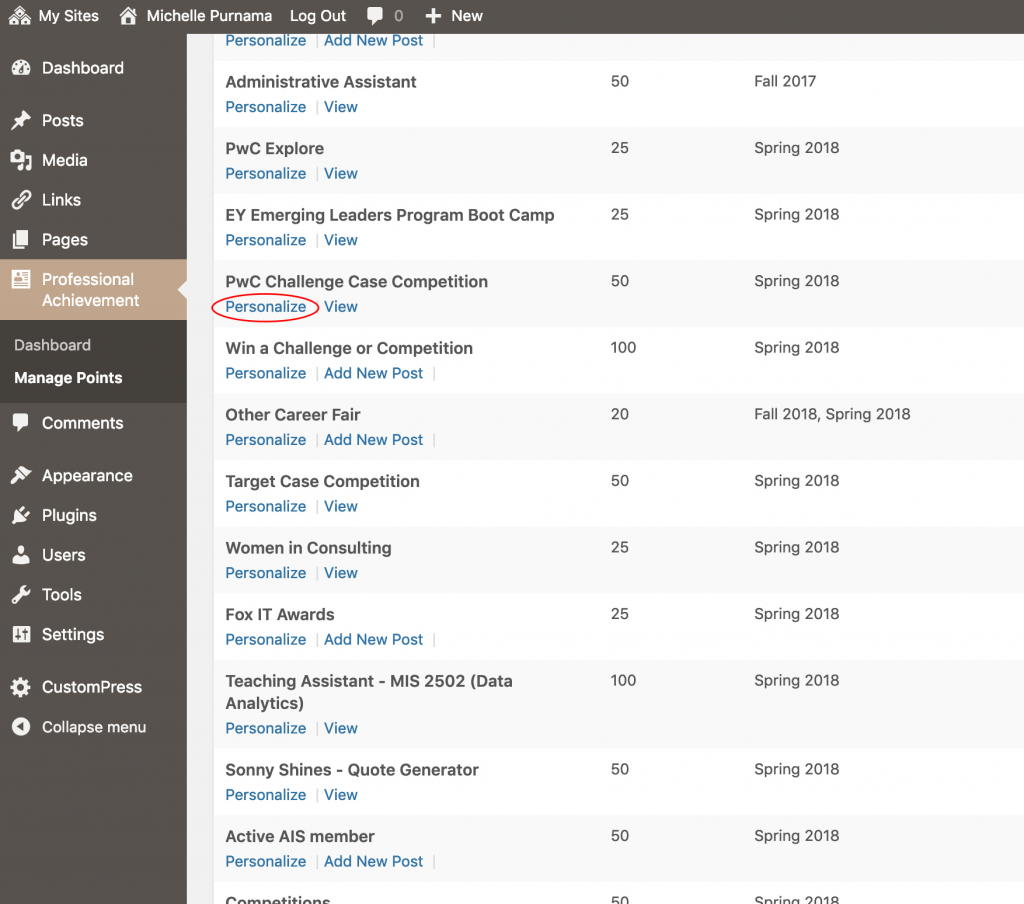
When you get points, the list of your point submissions will be displayed on the drop down sidebar of your e-portfolio. Instead of just having a long list of what you’ve done, you can link a certain submission to your existing post/page that reflects that particular experience. Alternatively, you can also create a new post attached to it to elaborate more on your achievement/activity! This is also helpful when you create your “Advanced E-Portfolio,” as it is part of the requirements to describe THREE different earned PRO points activities.

Here’s how you can personalize certain point submissions through your “Manage Points” dashboard:

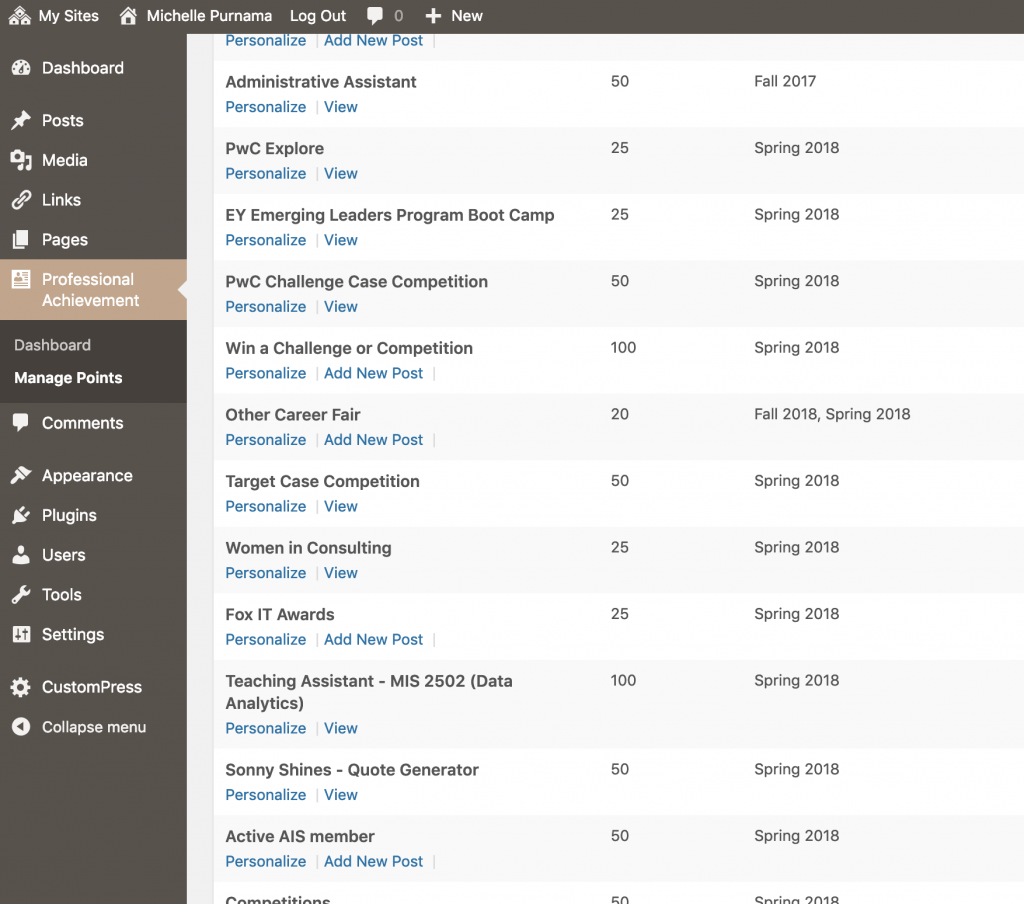
Step 1: In your dashboard,  go to Professional Achievement → Manage Points

You’ll see a list of your past point submissions and other relevant details.

Step 2: Choose a submission that you want to personalize

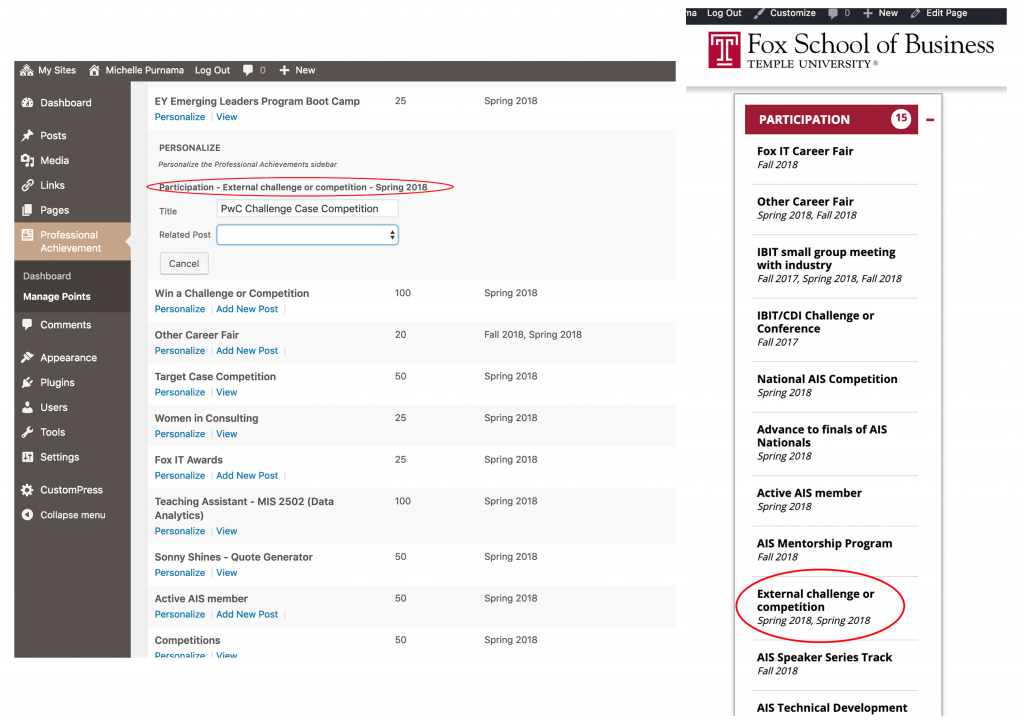
For example, if I want to personalize my “PwC Challenge Case Competition” submission, I will hover to that particular submission and click “Personalize”

You will see that the submission is currently displayed as “External challenge or competition” under “Participation”

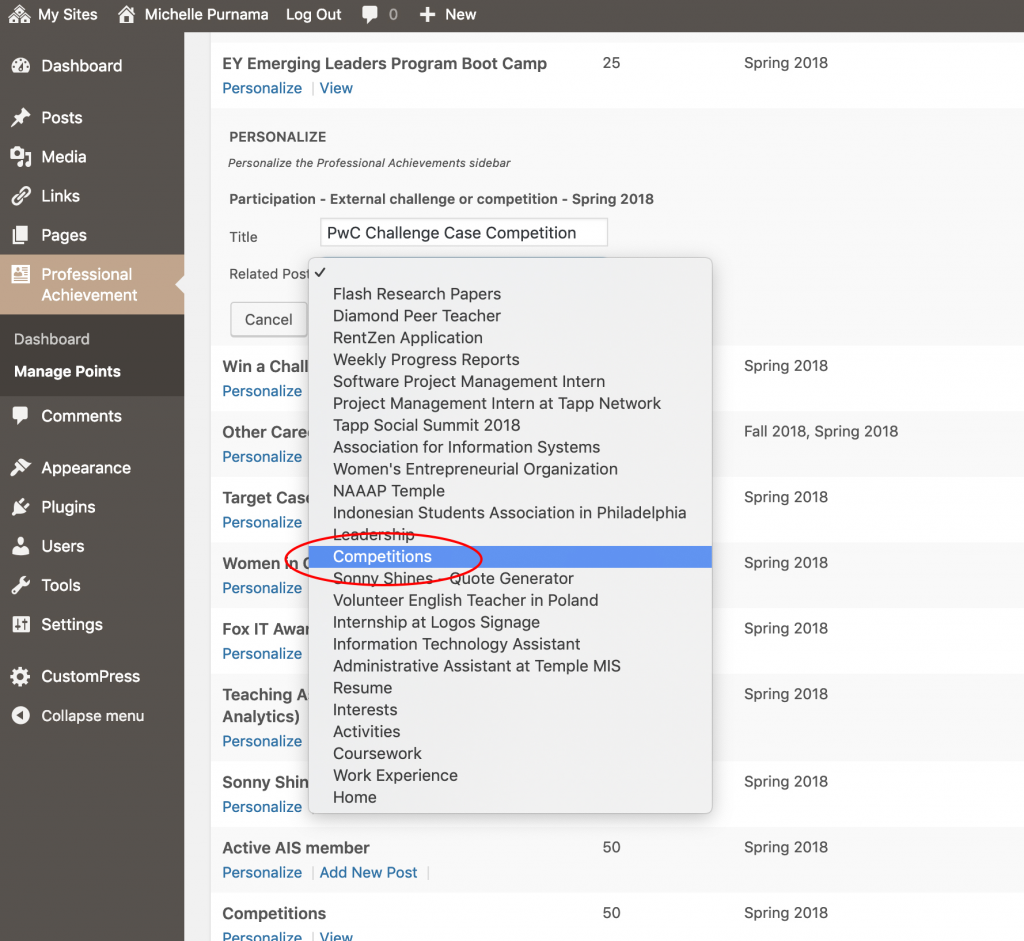
Step 3: From the “Related Post” dropdown, select the relevant post

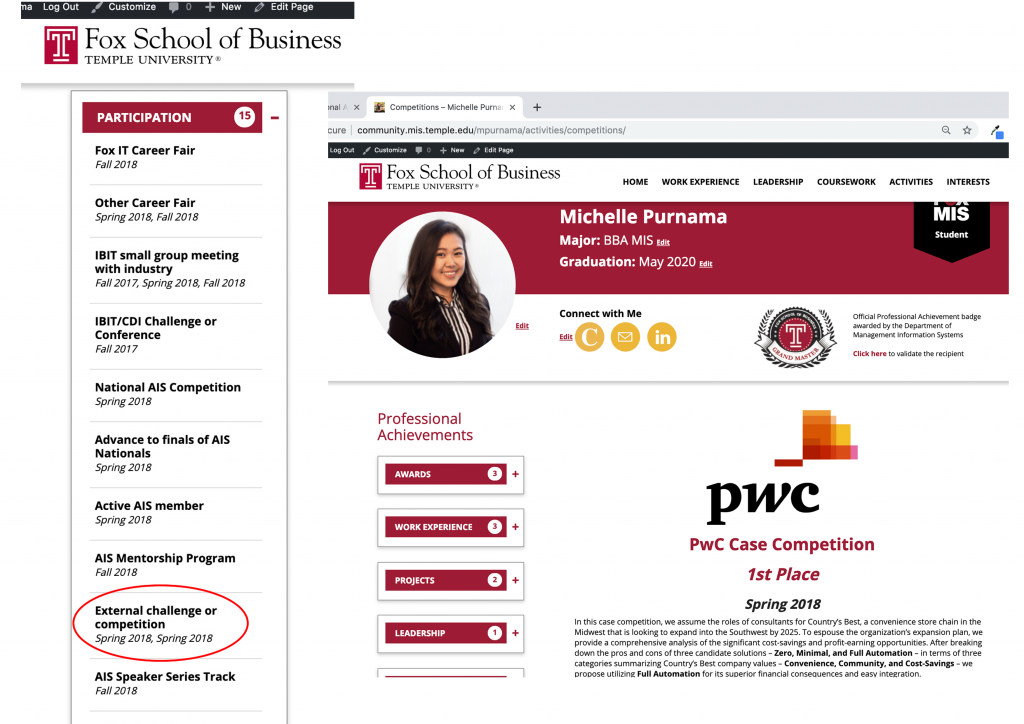
In this example, I already have a page on my e-portfolio about the competitions I’ve participated in titled “Competitions,” so that is the one I will select.

Click “Update”

Step 4: When you go to your e-portfolio and click on ‘External challenge or competition” under “Participation,” you should be directed to the “Competitions” page

Step 5: If you want to create a new post instead of linking it to an existing page/post, click “Add New Post” instead, and then write your post as usual


On your dashboard, you will notice that the title of your post submission will change to the title of your new post

On your e-portfolio, when you click on that point submission, it will direct you to the new post you just created!

Keep an eye on your inbox for the next tip!

If you have any thoughts or suggestions on tips that you’d like to see in the future, please let us know here.
Filed Under: Uncategorized Tagged With:

Creating Favicons

February 5, 2019 by Michelle Purnama Leave a Comment

E-PORTFOLIO TIP OF THE MONTH:

Creating Favicons

A favicon (short for favorite icon), is a small icon that represents your website, most often found in the address bar of your web browser or in lists of bookmarks. Creating a personalized favicon is a great way to enhance your personal brand as users can easily recognize your website at a glance. By default, the favicon of your e-portfolio is your profile picture, but here’s how you can change it:

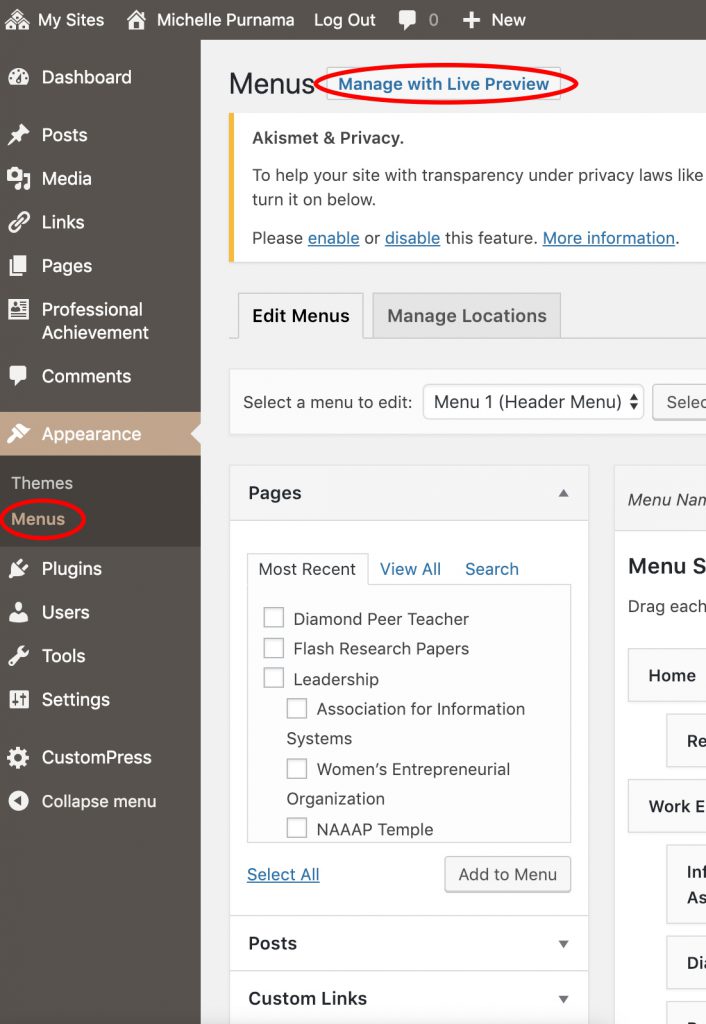
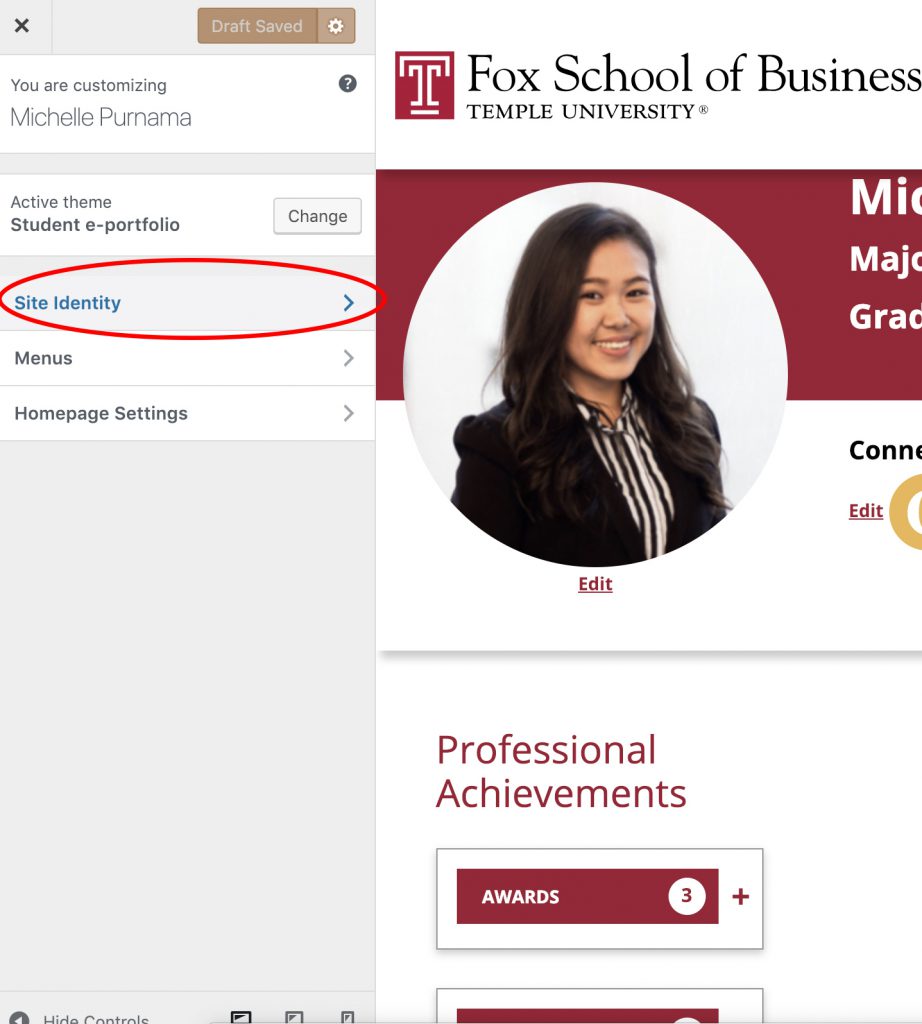
Step 1: In your dashboard, go to “Appearance” → “Menus” → “Manage with Live Preview”

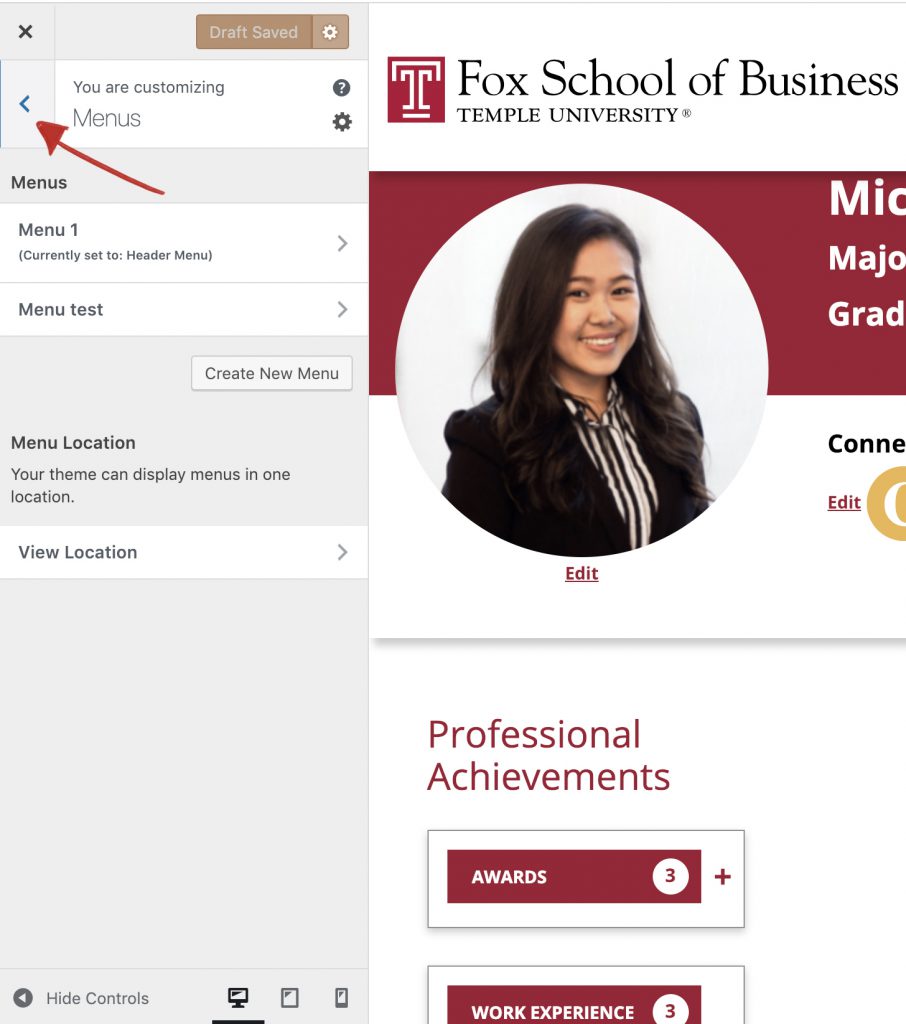
Step 2: On the top left, click on the blue back (“<”) icon, and then select “Site Identity”


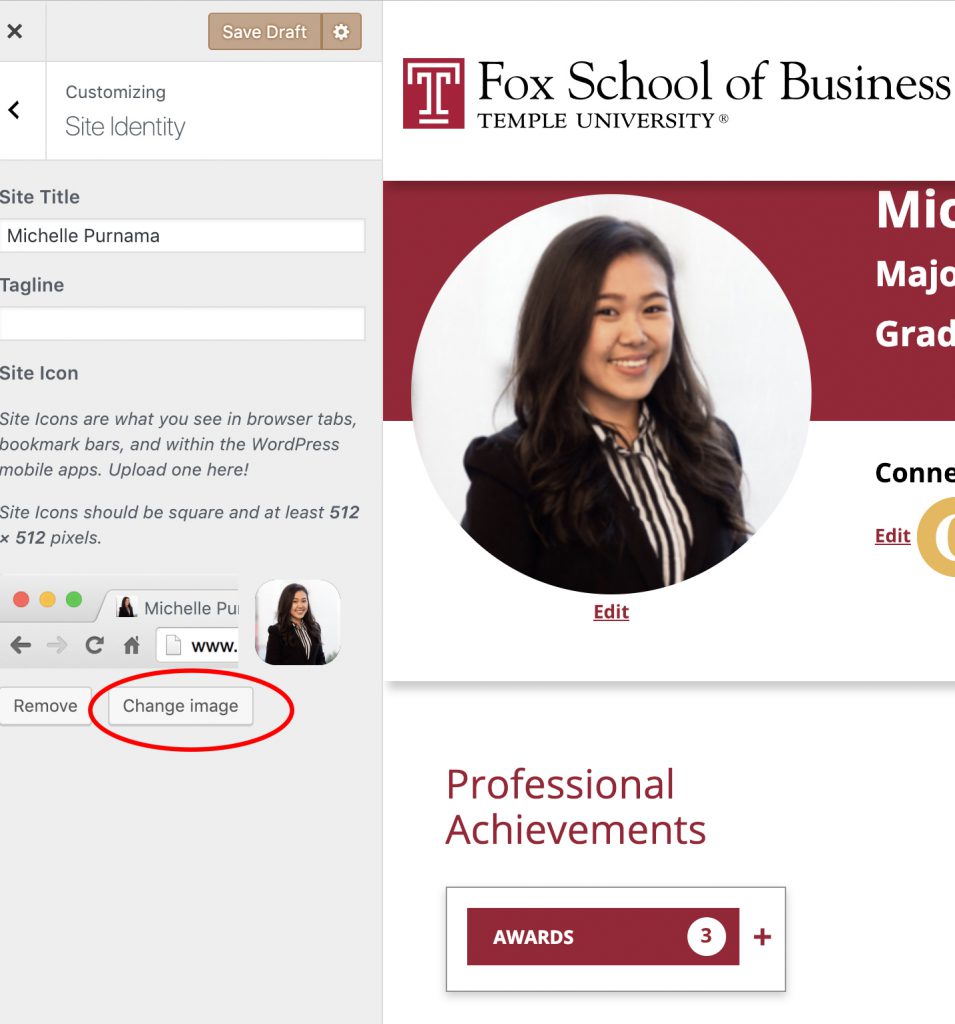
Step 3: Under “Site Icon,” click “Change Image.” Upload your desired favicon the same way you would upload an image on your e-portfolio

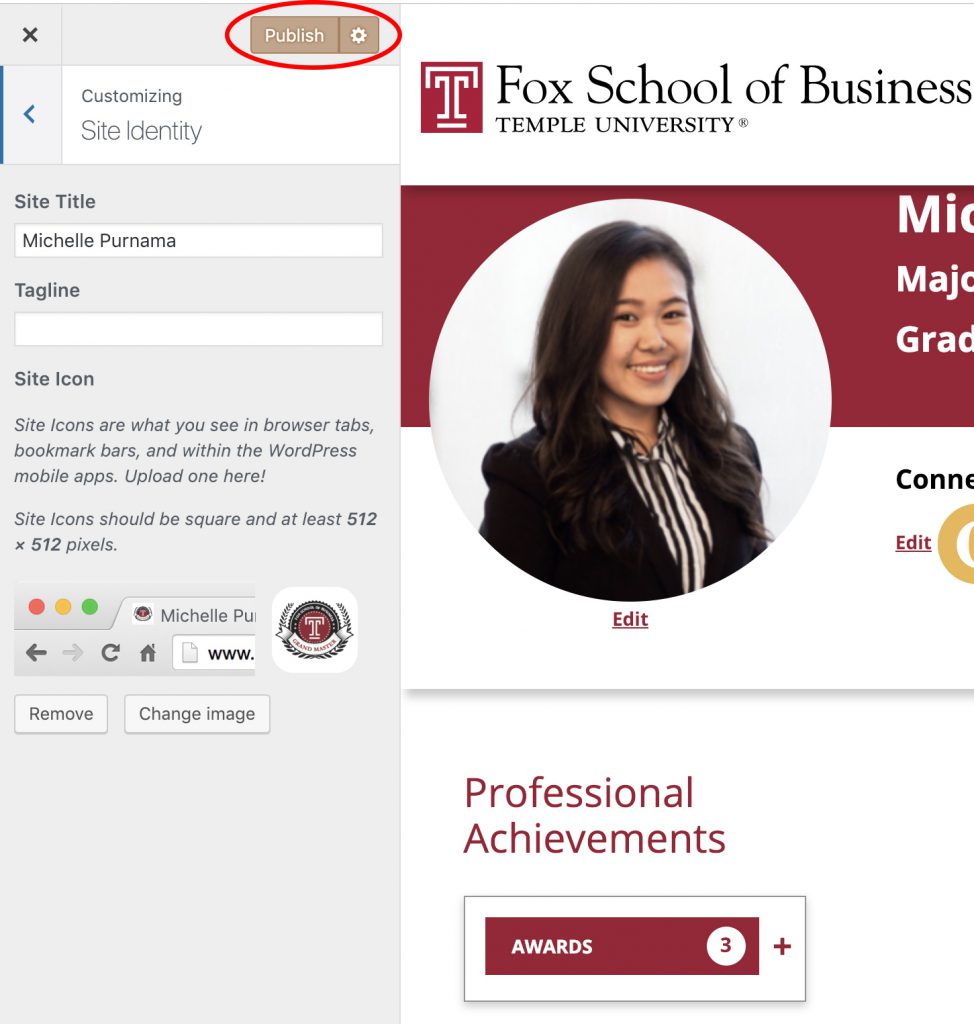
Step 4: Once you have uploaded your new favicon, click “Publish”

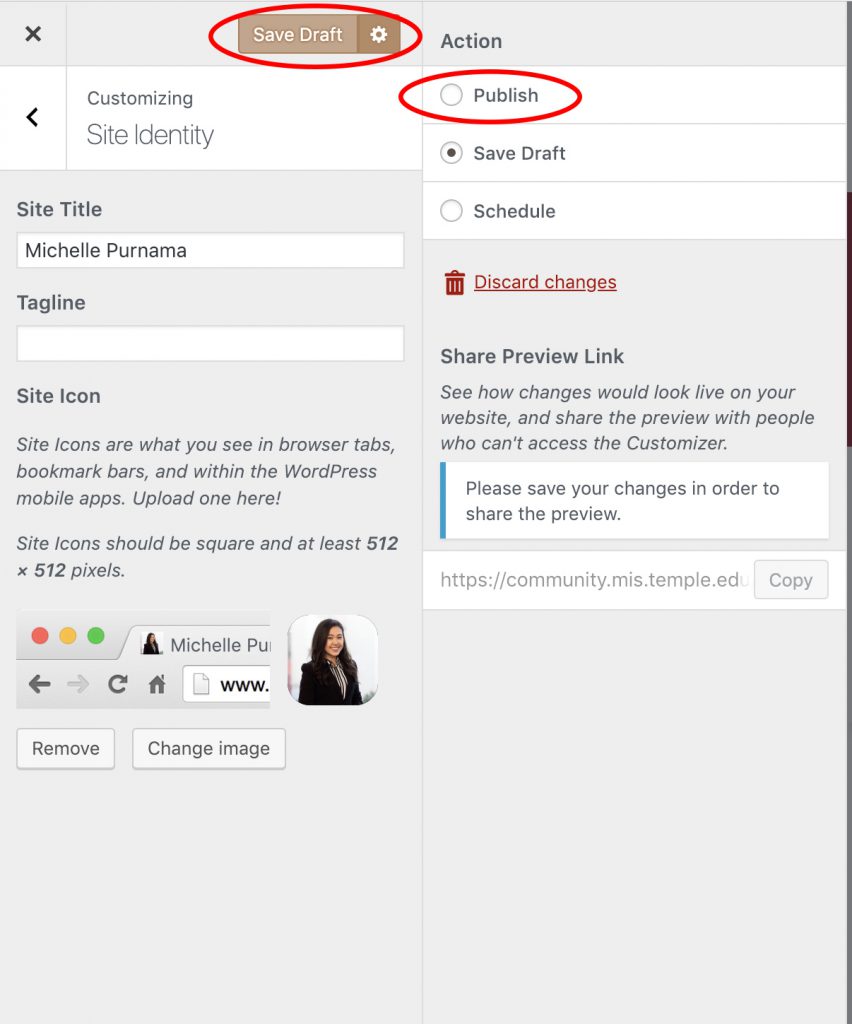
Side tip: if your page is not in “Publish” mode, click on the settings icon and change it to “Publish”

Step 5: You should be able to see your new favicon on your title bar of your browser as well as on your bookmark

Keep an eye on your inbox for the next tip!

If you have any thoughts or suggestions on tips that you’d like to see in the future, please let us know here.
Filed Under: Uncategorized Tagged With:

Adding Sub-Menus

December 10, 2018 by Michelle Purnama Leave a Comment

E-PORTFOLIO TIP OF THE MONTH:

Adding Sub-Menus

As you get involved and exposed to various types of experiences, you will have more things to write about and post on your e-portfolio! A common issue students make, is having too many top-level menu items. This tends to look cluttered and disorganized.

Using sub-menus is a great way to solve this problem! You can easily keep your e-portfolio simple and organized by displaying only the key highlights of your profile. For example, you can categorize the different pages you have into several distinct categories instead of displaying all of those pages in the top-level menus.

So instead of this:

You will have this:

And you can do it in just a few simple steps.

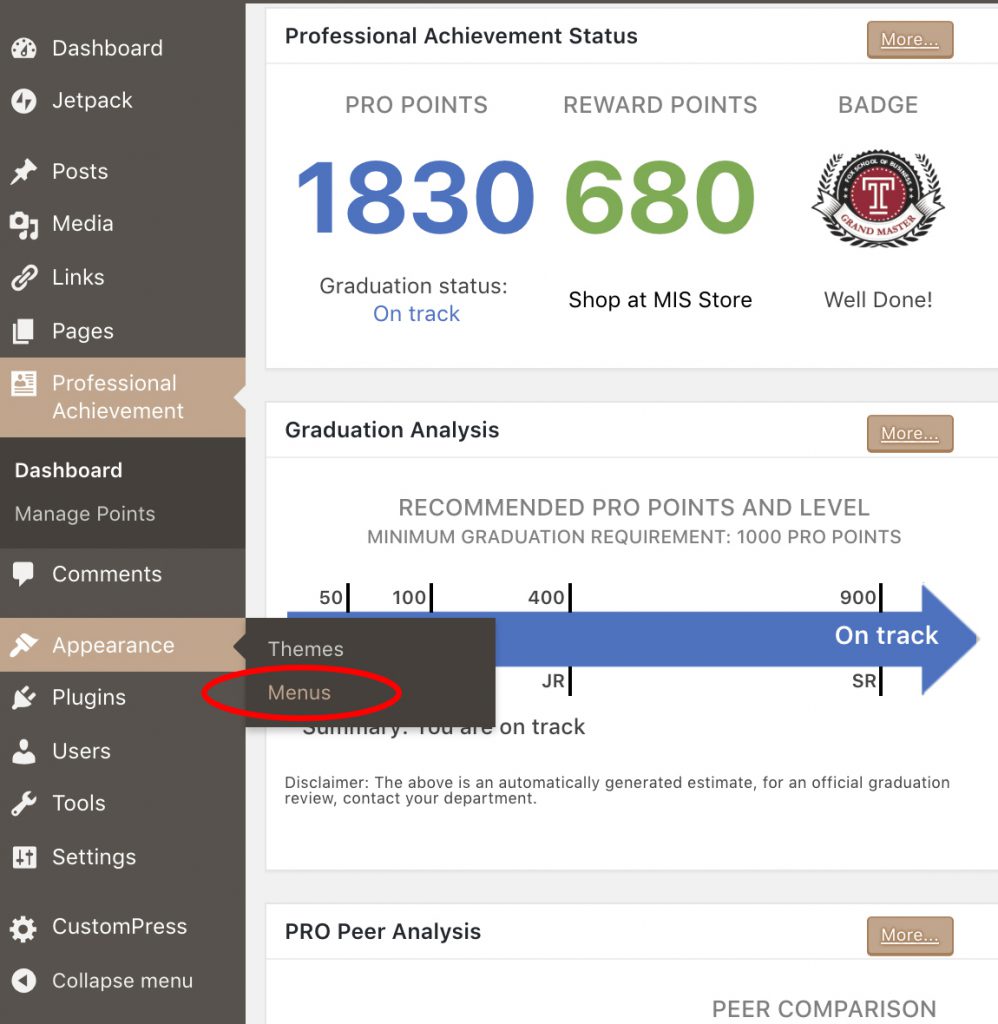
Step 1: In your dashboard, go to “Appearance” → “Menus”

Step 2: Go to “Manage Locations,” and choose a menu (eg. “Menu 1”) from the drop down. Click “Save Changes.”

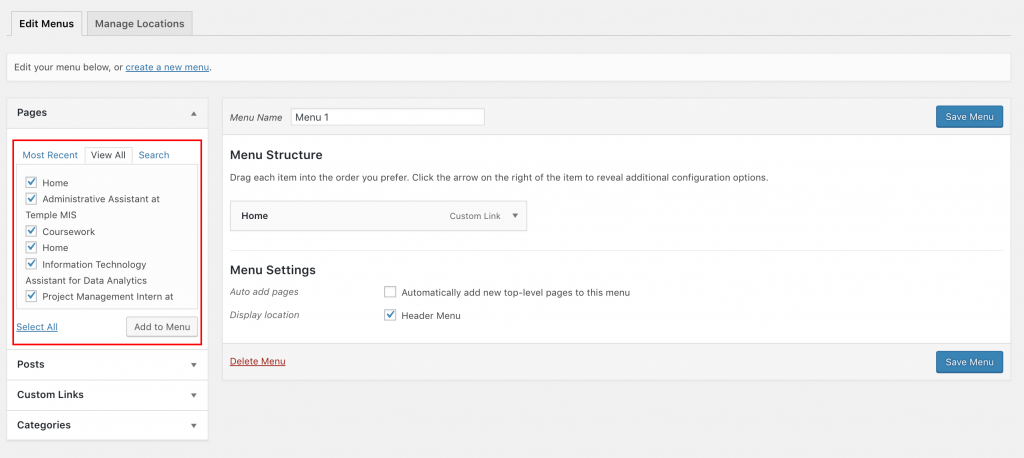
Step 3: Go back to “Edit Menus.” Before creating sub menus, select the menu items that you want to display by marking the check box under “Pages” and click “Add to Menu.”

You should see the menu items that you just added under “Menu Structure.” You can also drag the items up and down to organize the order of the menus.

Step 4: To create sub menus, drag the item that you want to make into a sub menu inwards (to the right).  It should say “sub item.”

When you’re done, hit “Save Menu”

Step 5: Go to your e-portfolio and check out that new look!

Keep an eye on your inbox for the next tip!

If you have any thoughts or suggestions on tips that you’d like to see in the future, please let us know here.

Filed Under: Uncategorized Tagged With:

Uploading PDFs

November 6, 2018 by Michelle Purnama Leave a Comment

E-PORTFOLIO TIP OF THE MONTH:

Uploading PDFs

If you are looking for sample scenarios of ways to earn points, get inspired and create a plan by reading about Josie Smith, a new freshman, or Mary Jones, a new transfer student!

As for our e-portfolio tip this month, we will learn how to post PDFs on your site.

Step 1: In your new post/page, click “Insert”  → “Add Media”.

Alternatively, you can click on “Add Media” above the menu bar.

Step 2: “Upload Files” → “Select Files”. Select your PDF to upload.

You can also upload multiple files at once.

Step 3: Select the file you want to post.

You can edit the “Title” to change the text that will appear in the post/page.

If you prefer to do it later, click “Insert into post.”

Step 4: Your PDF will be inserted as a hyperlink with your file name as the text.

If you want to change the text, click on the link, and the pencil icon.

Step 5: Click on the settings icon.

Change the “Link Text” to the text that you want to be displayed on the post/page.

If you want the file to pop up in a new tab when a user clicks on the link, check “Open link in a new tab” checkbox.

When you’re done making changes, click “Update”

Step 6: Make sure the text has been changed.

Save your changes and test out your link to make sure that it’s working.

It’s always a good practice to test out your link!

Keep an eye on your inbox for the next tip!

If you have any thoughts or suggestions on tips that you’d like to see in the future, please let us know here.
Filed Under: Uncategorized Tagged With:

Link Your LinkedIn Profile to Your E-Portfolio!

October 3, 2018 by Michelle Purnama Leave a Comment

E-PORTFOLIO TIP OF THE MONTH:

Link Your LinkedIn Profile to Your E-portfolio!

The MIS department is starting a new initiative to aid students in enhancing their digital brand. Every month, we are going to share a tip on ways to better utilize the community site to highlight your skills, accomplishments, interests, and body of work in a dynamic way.

You will get a step by step guide for each tip, and the tip will get more advanced each month. Impress your audience with your e-portfolio!

We are kicking off the series by sharing how to link your LinkedIn profile to your e-portfolio:


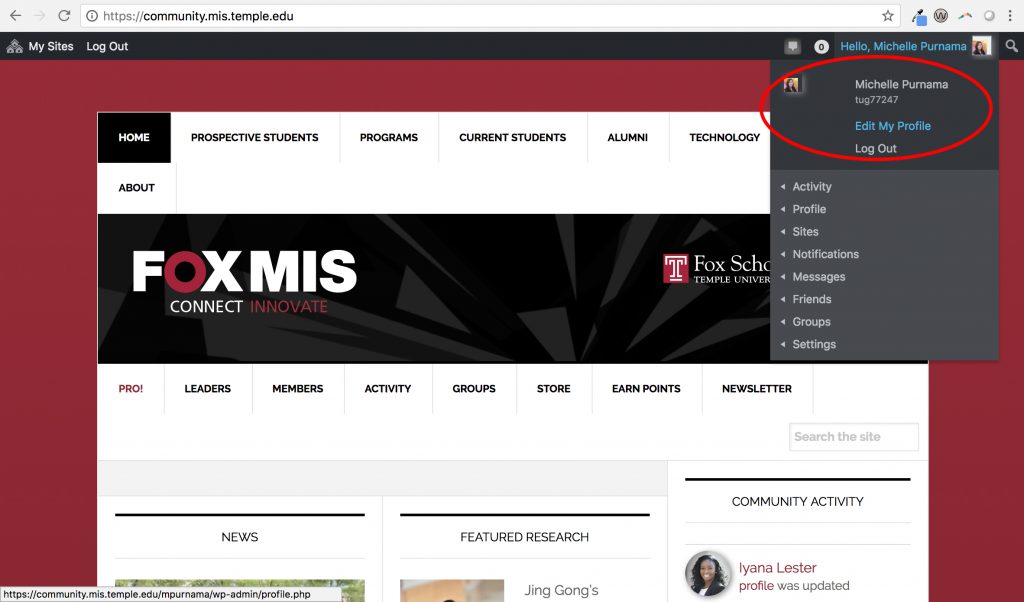
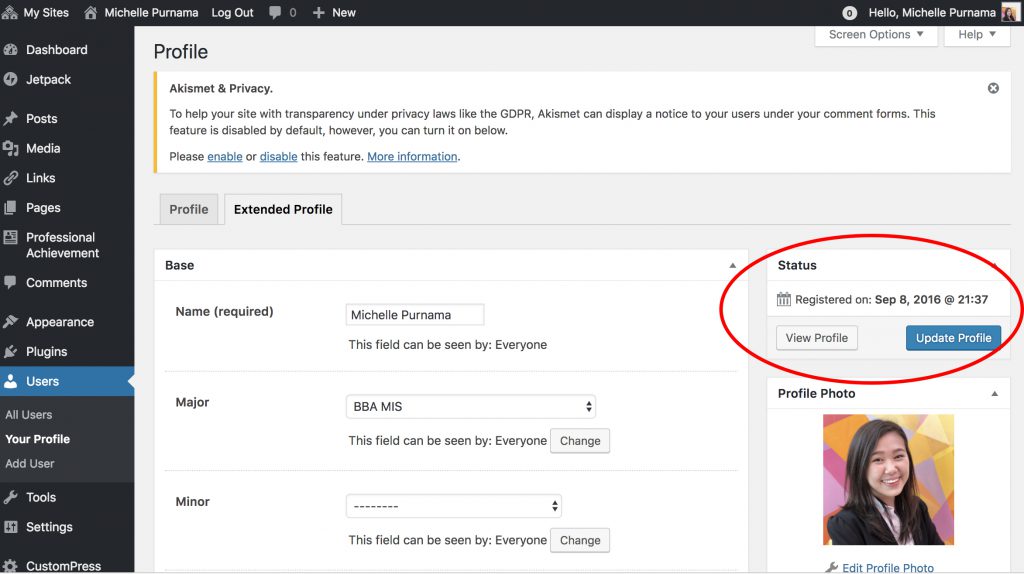
Step 1: Log in to your community site and go to “Edit My Profile”


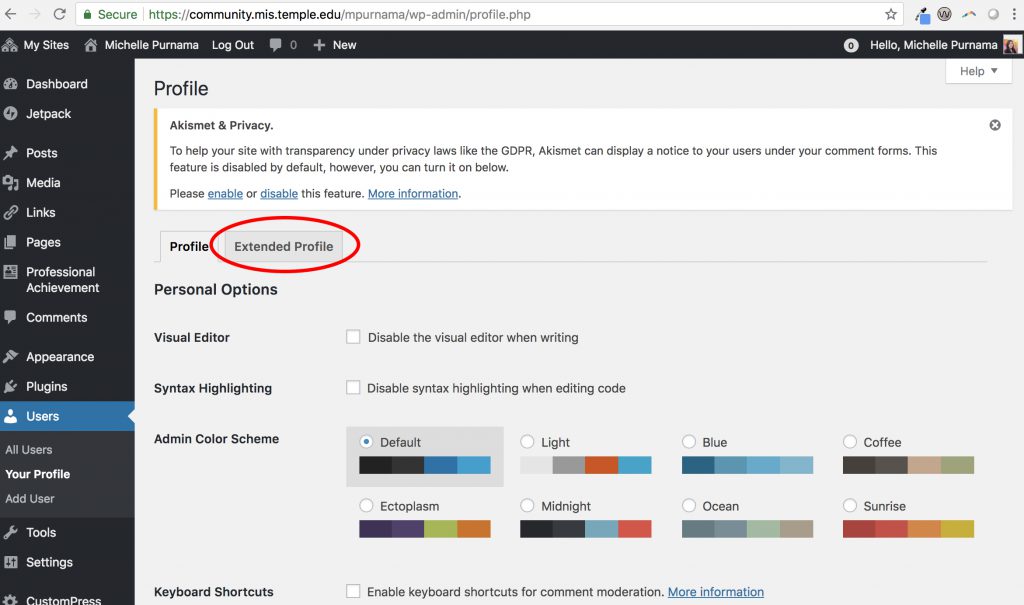
Step 2: Select “Extended Profile”


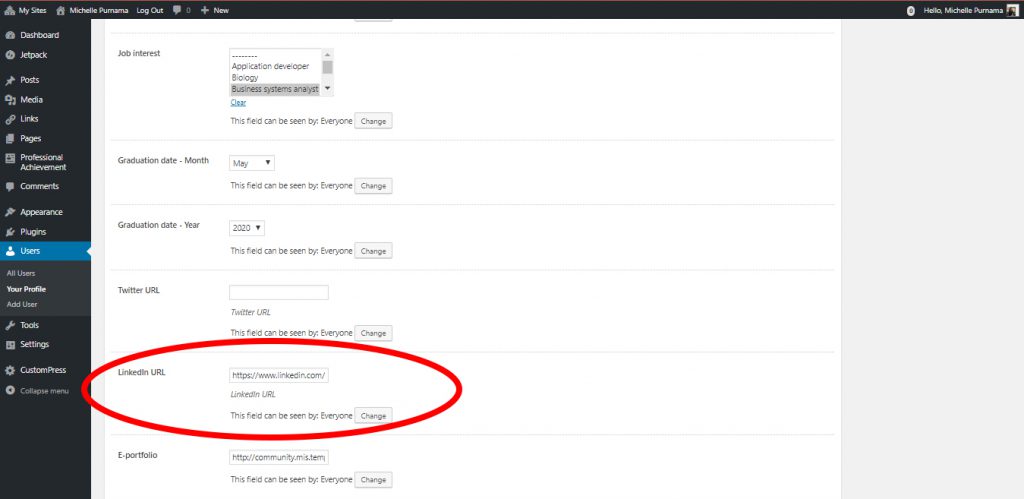
Step 3: Scroll down to “Professional Details” section, and you should be able to see a field to enter your LinkedIn URL.


Step 4: Scroll back up, and on the top right, click “Update Profile” to save your changes!


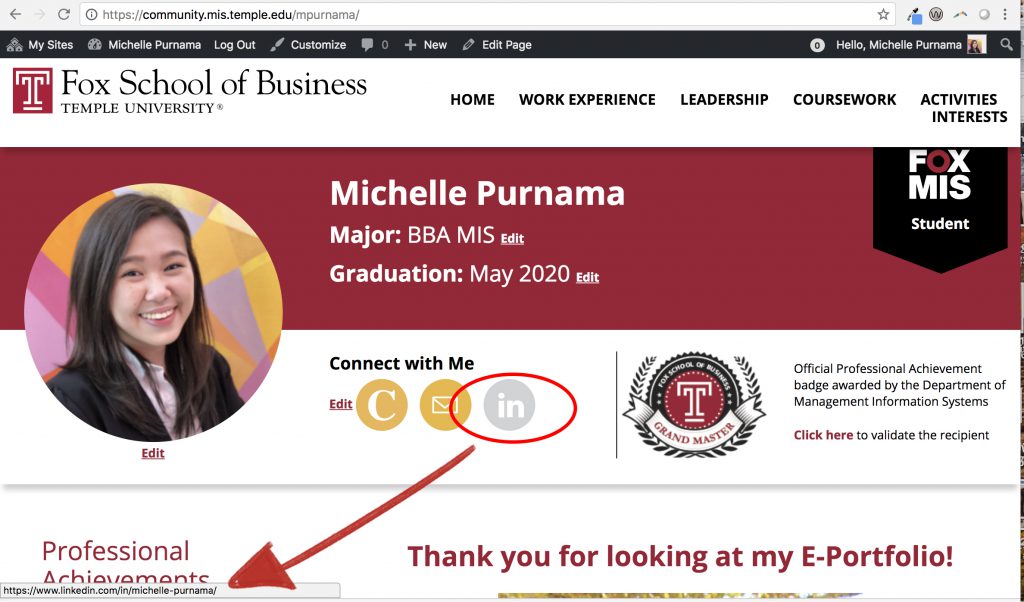
Step 5: When you hover over the LinkedIn logo in your e-portfolio, you should be able to see the link to your LinkedIn profile.

Click on the logo to make sure your link works perfectly!


Keep an eye on this page for the next tip!

We’d be happy to hear your thoughts on our first e-portfolio tip and your suggestions on tips that you’d like to see in the future by filling out a quick survey here.

Filed Under: Uncategorized Tagged With:

Primary Sidebar

Recent Profile Activity

Profile Photo
Kanghyun (Simon) Cho
profile was updated
Profile Photo
Ryan Kearney
profile was updated
Profile Photo
Manali Mishra
profile was updated
Profile Photo
Anna Lu
profile was updated
Profile Photo
Anna Lu
profile was updated
1 2 3 … 138 »

GRANDMASTERS

Profile Photo
Profile Photo
Nicholas Bortz
Alison Park
Profile Photo
Profile Photo
Kelly Liu
Cammy Nguyen
More ...

Copyright © 2025 · News Pro on Genesis Framework · WordPress · Log in